CodeIgniter Chat example

How to creating and integrate gmail, facebook like chat system to the CodeIgniter system or web site.In this article is describing step by step how to integrate simple chat process into the CodeIgniter.
CodeIgniter Chat example Features
- Multiple chatting
- Using JQuery Ajax
- Display notifications by changing colors
- Displays Sent time after 3 minutes of inactivity
- Basically similar to Gmail, Facebook like chat box
- Auto-resize of text input box
- Minimize and close chat boxes
Browser Compatibility
1. Firefox 2+
2. Chrome
3. Internet Explorer 6+
4. Safari 2+
5. Opera 9+
CodeIgniter Facebook like ajax Live Chat Plugin Version 2
CodeIgniter Facebook like ajax Live Chat Plugin Version 2
How to create chat process
Step-1
1-First install fresh codeigniter into your localhost or web server.You can learn how to install codeigniter by it’s official web site.
2-Open the config file(application/config/config.php) and put your server and database details there.
Also need to as TRUE.
    $config['hostname'] 	= "localhost";
    $config['db_username'] 	= "root";
    $config['db_password'] 	= "";
    $config['db'] 		= "codeigniter";
    $config['sess_cookie_name']	= 'ci_session';
    $config['sess_expiration']	= 7200;
    $config['sess_expire_on_close']	= FALSE;
    $config['sess_encrypt_cookie']	= TRUE;  // This must be TRUE
    $config['sess_use_database']	= FALSE; // This must be FALSE
    $config['sess_table_name']	= 'ci_sessions';
    $config['sess_match_ip']	= FALSE;
    $config['sess_match_useragent']	= TRUE;
    $config['sess_time_to_update']	= 300;
    $config['cookie_path']	= "/";
Step-2
1-Go to the phpmyadmin, run this tables there.
Chat table
DROP TABLE IF EXISTS `chat`;

CREATE TABLE `chat` ( `id` INTEGER UNSIGNED NOT NULL AUTO_INCREMENT,
`from` VARCHAR(255) NOT NULL DEFAULT '',
`to` VARCHAR(255) NOT NULL DEFAULT '',
`message` TEXT NOT NULL,
`sent` DATETIME NOT NULL DEFAULT '0000-00-00 00:00:00',
`recd` INTEGER UNSIGNED NOT NULL DEFAULT 0,
PRIMARY KEY (`id`),
INDEX `to` (`to`),
INDEX `from` (`from`) )
ENGINE = InnoDB
CHARSET=latin1;
Users table
DROP TABLE IF EXISTS `ci_users`;

CREATE TABLE `ci_users` ( `user_id` int(11) NOT NULL auto_increment,
`user_name` varchar(255) NOT NULL,
`user_email` varchar(255) NOT NULL,
`user_password` varchar(255) NOT NULL,
`registered_date` datetime NOT NULL,
`status` int(5) NOT NULL,
`online` int(5) NOT NULL,
PRIMARY KEY (`user_id`,`user_email`) )
ENGINE=InnoDB
CHARSET=latin1;
Download full database from here.
Download “Database-file.txt” Database-file.txt – Downloaded 1910 times – 8.34 KB
Step-3
1-Download this chat.js Javascript file and keep it in the script folder named as js(application/js).
Open that file and replace your site url instead of the “http://localhost/CodeIgniter/”.There are 4 places.
Download chat.js file from here. Download “chat-js.zip” chat-js.zip – Downloaded 2447 times – 3.34 KB

2-Also you need to put these jquery.js files there.
3-Then download these 3 css files and keep those in the css folder(application/css).
Download css files(3 KB)
Download “chat.css.zip” chat.css.zip – Downloaded 2055 times – 2.08 KB
File structure.

Step-4
1-Create a file to display online users.
-application/views/chat/userList.php (view file)
userList.php file structure
session_start();
// Must be already set
$_SESSION['username'] = $this->session->userdata('username');
?>
| User Id | User Name |
|---|---|
| user_id; ?> | user_name; ?> |
-application/controllers/chat.php (controller file)
chat.php controller file structure
class Chat extends Controller {

    //Global variable to holds the output data for each view
    public $outputData;
    public $loggedInUser;


    function Chat()
    {
        parent::Controller();
        session_start();

        //Get Config Details From Db
        $this->config->db_config_fetch();

       //Manage site Status
        if($this->config->item('site_status') == 1)
        redirect('offline');

        $this->load->model('user_model');

        //load Helpers
        $this->load->helpers('users');

        //Load the session library
        $this->load->library('session');
    }


}  // End of the class
2-Download this chat.php file to process the chat, and put it in the application/views/chat/
Download chat.php file from here.
Download “chat.php_.zip” chat.php_.zip – Downloaded 2360 times – 1.78 KB
Open that file and put the server, database details there and save it.
    define ('DBPATH','localhost');
    define ('DBUSER','root');
    define ('DBPASS','');
    define ('DBNAME','codeigniter');
3-Go to the model folder and create file named users_model.php
class Users_model extends CI_Model {
    /** * Constructor * */
    function __Construct() {
        parent::__Construct();
    }
    // --------------------------------------------------------------------

    /** * Get Users */
    function getUsers($conditions=array(),$fields='') {
        parent::__construct();
        if(count($conditions)>0)
            $this->db->where($conditions);
        $this->db->from('ci_users');
        $this->db->order_by("ci_users.user_id", "asc");
        if($fields!='')
            $this->db->select($fields);
        else
            $this->db->select('ci_users.user_id,ci_users.user_name,ci_users.user_email,ci_users.online');
        $result = $this->db->get(); return $result; }
    //End of getUsers Function
}
My file structure like this.

Screens
Chat by Chris:

Chat by Sumith

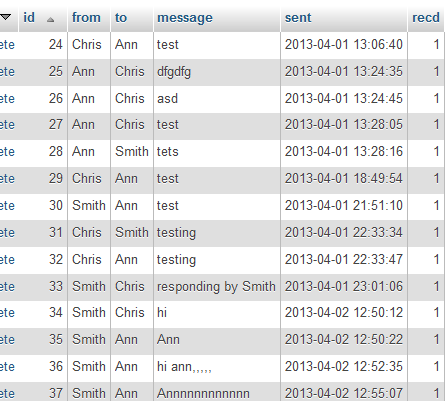
Chat history saved in the table
That’s only.
View CodeIgniter Chat example Demo
Full source code containing with users login and logout process.
Download Full CodeIgniter Chat Example(2.6 MiB)
Download “CodeIgniter Chat example full source code” CodeIgniter-chat-Example-Full-source-code.zip – Downloaded 3962 times – 2.60 MB